Tag Archives: C#

Netduino Plus 2 (NETMF) and WS2812 RGB LEDs

Some weeks ago I got some Adafruit NeoPixel, a compact RGB LED module. Each LED module has a WS2812 chip that only needs three wires: power, ground and data. The data protocol is self-clocking, at a rate of 800KHz. The LED modules can be chained to build longer LED stripes. (For more details see the Adafruit NeoPixel Überguide.)

Adafruit provides an Arduino library on github to control the LEDs, but there is no direct support for Microsoft .NET Microframework (NETMF) controllers like the Netduino Plus 2 that I was going to use.

Actually, there is an advanced guide to use NETMF controllers with the WS2812 LEDs, but it requires a custom firmware, because it seems that the GPIO pins of most NETMF controllers are not fast enough to switch the signal at the needed rate (there is a timing needed in the range of 0.4μs to 0.8μs and some websites found out that the GPIO pins have a latency of 17μs). As I nearly bricked a Netduino before, I didn’t want to dive into custom firmwares at this point.

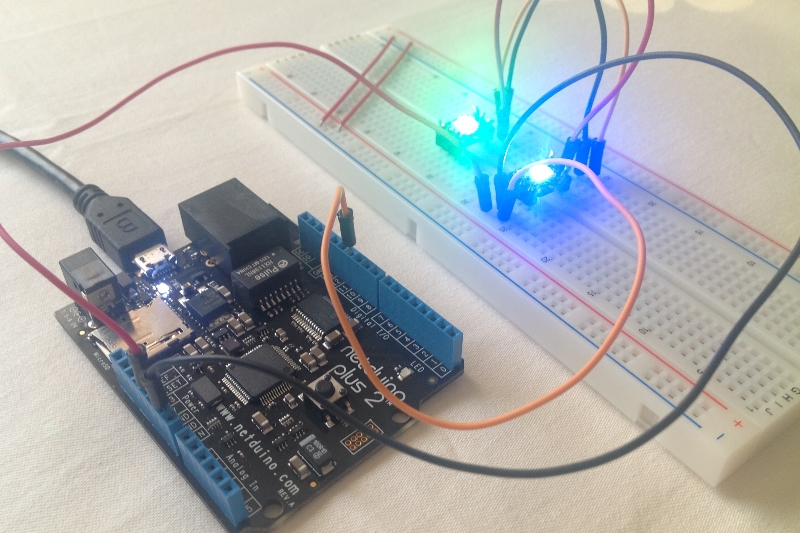
So I found a different way to send the control codes to the LEDs at the needed speed as the following photo proves:

Netduino with WS2812 LEDs

How does it work?

I thought that there must be a faster way to get signals off a Netduino Plus 2 because it has an Ethernet port and SD card slot, and I suppose they need to be adressed faster than 17μs (I haven’t evaluated this, so maybe I’m wrong with that, but it led me in the right direction). Looking at the ports that the Netduino provides my attention was drawn towards the SPI interface.

SPI (Serial Peripheral Interface) is a four-wire master-slave interface for full-duplex communication between chipsets. It has a clock wire (SCLK), output (MOSI) and input (MISO). Normally it can be used at a frequency up to some MHz, so the ports must be really fast.

My assumtion was, that I could only use the output (MOSI) pin, configure the frequency accordingly and send the needed control bytes on that wire to the LEDs. I tried some settings and data packets, but first without any success, but luckily I wasn’t the first one to try this, so I found some code snippets for different microcontrollers, that pointed me into the right direction, e.g. that a timing of 6.666MHz is recommended.

I’ve written two classes and uploaded them to github, so if you have a Netduino Plus 2 (or similar microcontroller) and don’t want to use a custom firmware to control WS2812 RGB LEDs, then maybe you want to give my code a try.

Code on github: https://github.com/jcoder/NetMFNeoPixelSPI

Usage example:

NeoPixelSPI neoPixel = new NeoPixelSPI(Pins.GPIO_PIN_D10, SPI.SPI_module.SPI1);
Pixel pixelRed = new Pixel(255, 0, 0);
Pixel pixelGreen = new Pixel(0, 255, 0);
Pixel pixelBlue = new Pixel(0, 0, 255);
Pixel pixelWhite = new Pixel(255, 255, 255);
Pixel[] block1 = new Pixel[] { pixelRed, pixelWhite };
Pixel[] block2 = new Pixel[] { pixelBlue, pixelGreen };
int waittime = 1000;
while (true)
{
 neoPixel.ShowPixels(block1);
 Thread.Sleep(waittime);
 neoPixel.ShowPixels(block2);
 Thread.Sleep(waittime);
}

The library code is not optimized (yet), and I didn’t write a helper class for easier handling of long LED stripes (because I don’t own one), so feel free to extend the code. I’m not quite sure if this approach is really a good one, but it worked for me.

Also feel free to leave a comment below if you have any remarks, ideas, etc.

As always: use this information and the code on your own risk. ;)

Netduino Scripted Lights

Playing around with a FEZ Panda II is a lot of fun, especially when it comes to LED lights (and when it’s getting dark outside). Sure, you can make them simply blink, or maybe progam a more complex light-switching pattern, but you always end up with a lot of code to address the LEDs and wait some time between changing their state.

To make it easier to work with an LED, I’ve written a small wrapper class some time ago as described in this posting, but I really wanted to come around having to write a lot of (non-reusable) code just to make some LEDs blink.

My current solution: a very simple, char-based scripting module to control the LEDs. This is how it works:

  • You define some simple script like "R2 r2" or "GH4 YZ4 a2"
  • Based on the ILights interface, you create an instance of LEDLights
  • An outer loop defines how often the sequence should be executed
  • The inner loop iterates over the sequence and passes each char to the mini engine
  • The lights start blinking, or whatever you told them to do

Actually, some of these steps could be encapsulated and the pin configuration for the LEDs is currently hard-coded, but for the beginning I wanted to keep the things as easy as possible.

See it in action

How does the script work?

In short: an uppercase letter switches the LED on, a lowercase letter switches it off, and a numerical letter pauses between two actions. I recently got some additional LEDs so I added support for 6 LEDs (please look up the pin configuration in the source code).

  • r / R : red LED no. 1
  • s / S : red LED no. 2
  • y / Y : yellow LED no. 1
  • z / Z : yellow LED no. 2
  • g / G : green LED no. 1
  • h / H : green LED no. 2
  • a / A : all LEDs at once
  • 1, 2, 3, …, 9 : pause for 500ms, 1000ms, 1500ms, …, 4500ms

All other characters are currently ignored, so you can add spaces to separate the parts of the script which makes it easier to read the script sequence.

Some examples

R2 r2 – the red LEDs is switched on, then waits for 1000ms, then  the LED is switched off and the script waits again for 1000ms

R1Y1G4 r1y1g4 – the red, yellow and green LED is switched with short delay, then switched off again

zY2 yZ2 – the two yellow LEDs blink alternately

Tipps, tricks and ideas

When defining a sequence make sure that you add pauses, because otherwise the LEDs fill flicker based on the Netduino’s maximum speed.
It’s easy to forget the pause at the end of the script, which makes the sequence look strange when it gets repeated.
Of course, you can switch off an LED at the beginning of the script, even if it was not switched off before. This is very useful if the sequence has a complex overall pattern and an LED must stay switched on at the end of the script.

Some ideas to extend this project:

  • Store more than one sequence in the program and add an IR-receiver or simply a button to switch the sequences
  • Read the sequences from an SD card
  • Connect the Netduino to the network and add either a webserver to the program to enter the sequence or fetch it from a website (or even from Twitter)

Source Code

For the LED class please look at this posting.

public interface ILights
{
    void LightCommand(char c);
}

public class LEDLights : ILights
{
    private int baseDelay = 500;

    private LED led_R = new LED(GHIElectronics.NETMF.FEZ.FEZ_Pin.Digital.Di1);
    private LED led_Y = new LED(GHIElectronics.NETMF.FEZ.FEZ_Pin.Digital.Di0);
    private LED led_G = new LED(GHIElectronics.NETMF.FEZ.FEZ_Pin.Digital.Di8);
    private LED led_S = new LED(GHIElectronics.NETMF.FEZ.FEZ_Pin.Digital.Di5);
    private LED led_Z = new LED(GHIElectronics.NETMF.FEZ.FEZ_Pin.Digital.Di3);
    private LED led_H = new LED(GHIElectronics.NETMF.FEZ.FEZ_Pin.Digital.Di2);

    public void LightCommand(char c)
    {
        switch (c)
        {
            case 'r': led_R.Off(); break;
            case 'R': led_R.On(); break;
            case 'y': led_Y.Off(); break;
            case 'Y': led_Y.On(); break;
            case 'g': led_G.Off(); break;
            case 'G': led_G.On(); break;
            case 's': led_S.Off(); break;
            case 'S': led_S.On(); break;
            case 'z': led_Z.Off(); break;
            case 'Z': led_Z.On(); break;
            case 'h': led_H.Off(); break;
            case 'H': led_H.On(); break;
            case 'a': led_R.Off(); led_Y.Off(); led_G.Off(); led_S.Off(); led_Z.Off(); led_H.Off(); break;
            case 'A': led_R.On(); led_Y.On(); led_G.On(); led_S.On(); led_Z.On(); led_H.On(); break;
            case '1': case '2': case '3': case '4': case '5': case '6': case '7': case '8': case '9': Sleep(c); break;
        }
    }

    protected void Sleep(char c)
    {
        int num = c - '1' + 1;
        int delay = num * baseDelay;
        Thread.Sleep(delay);
    }
}

public class Program
{
    public static void Main()
    {
        string sequence = "R2 r2;
        // process sequence
        ILights lights = new LEDLights();
        // switch off all lights at the beginning
        lights.LightCommand('a');
        // outer loop
        bool looping = true;
        while (looping)
        {
            for (int i = 0; i < sequence.Length; i++)
            {
                char c = sequence[i];
                lights.LightCommand(c);
            }
        }
    }
}

C# Extension Methods, Part 2

I’ve just made another tiny addition to my extension method class / project, adding a small, but maybe useful method:

/// <summary>
/// Repeats this IEnumerable a given number of times
/// </summary>
/// <param name="enumerable">this IEnumerable</param>
/// <param name="times">number of times to repeat this IEnumerable</param>
/// <returns>IEnumerable</returns>
public static IEnumerable<T> Repeated<T>(this IEnumerable<T> enumerable, int times)
{
    if (times < 1)
    {
        yield break;
    }
    for (int i = 0; i < times; i++)
    {
        foreach (T oneObject in enumerable)
        {
            yield return oneObject;
        }
    }
}

This is how to use it to consume an IEnumerable<T> multiple times:

var range = Enumerable.Range(1, 5);
foreach (var i in range.Repeated(5))
{
    // doing something with i, which will be the sequence
    // from 1 to 5, repeated 5 times
}

It’s not a big deal, but maybe it’s helpful anyway. Btw, the source code is updated, too.

Netduino Switching Lights (with interaction)

After my first and very simple Netduino project, the traffic lights, I wanted to get a little step further. So I’ve put together some lines of code to make the LEDs show the sequence red, yellow, green, off with a fixed interval in between. And I want this interval to be controllable with the Variable Resistor (POT).

The main goal was actually not to build some great light animation, but to learn more about the possibilities behind the scenes. You’ll find find the complete project in the attached ZIP file (see end of this posting), so I’ll focus on two simple, but helpful details in this posting.

The first one is that I encapsulated the access to the LEDs using a class which holds a reference to the output pin, the LED’s state (on/off) and provides the three methods On(), Off() and Toggle() to make it easier to interact with the LED in code. I’m pretty sure that I’ll use (and extend) this LED class in upcoming projects.

public class LED : IDisposable
{
    private OutputPort port;
    private bool state;

    public LED(FEZ_Pin.Digital pin)
        : this(pin, false)
    {
    }

    public LED(FEZ_Pin.Digital pin, bool initialState)
    {
        this.port = new OutputPort((Cpu.Pin)pin, initialState);
        this.state = initialState;
    }

    public void On()
    {
        this.port.Write(true);
        this.state = true;
    }

    public void Off()
    {
        this.port.Write(false);
        this.state = false;
    }

    public void Toggle()
    {
        if (this.state == true)
        {
            this.Off();
        }
        else
        {
            this.On();
        }
    }

    public bool State
    {
        get
        {
            return this.state;
        }
    }

    public void Dispose()
    {
        this.port.Dispose();
    }

}

The second class simplifies the Analog Input handling. When attaching the POT you normally create a static variable to hold the reference to the analog input and read its value when you think it might have changed and you then need to react to this change.

This might be a practical approach in many cases but sometimes it would be nice to be more event-based. So that’s where the class ActiveAnalog kicks in. It encapsules an analog input pin offers the event ValueChanged which provides the current value and the offset change from the previous value. Internally a thread is used to read the analog pin’s value every 20 milliseconds, compare the value with the previous value and fire the event if the value has changed. Nothing spectacular, but it makes it easier for some projects to react on analog pin value changes.

public class ActiveAnalog : IDisposable
{
    private const int READ_INTERVAL = 20;
    private AnalogIn analogPin;
    private Thread readThread;
    private bool active = true;
    private int previousValue;
    private int currentValue;

    public delegate void AnalogValueChange(int currentValue, int offset);

    public event AnalogValueChange ValueChanged;

    public ActiveAnalog(FEZ_Pin.AnalogIn pin)
        : this(pin, 100)
    {
    }

    public ActiveAnalog(FEZ_Pin.AnalogIn pin, int maxScale)
    {
        if (maxScale < 1)         {             maxScale = 1;         } else if (maxScale > 3300)
        {
            maxScale = 3300;
        }
        this.analogPin = new AnalogIn((AnalogIn.Pin)pin);
        this.analogPin.SetLinearScale(0, maxScale);
        this.readThread = new Thread(this.ReadValue);
        this.readThread.Start();
    }

    private void ReadValue()
    {
        this.currentValue = this.analogPin.Read();
        while (this.active)
        {
            this.previousValue = this.currentValue;
            this.currentValue = this.analogPin.Read();
            if (this.previousValue != this.currentValue)
            {
                if (this.ValueChanged != null)
                {
                    this.ValueChanged(this.currentValue, this.currentValue - this.previousValue);
                }
            }
            try
            {
                Thread.Sleep(READ_INTERVAL);
            }
            catch (Exception)
            {
            }
        }
    }

    public int CurrentValue
    {
        get
        {
            return this.currentValue;
        }
    }

    public int PreviousValue
    {
        get
        {
            return this.previousValue;
        }
    }

    public void Dispose()
    {
        this.active = false;
        this.readThread.Abort();
        this.readThread = null;
    }
}

The complete project is available for download at http://blog.jcoder.me/files/Netduino/NetduinoSwitchingLights.zip

Continuous project: C# Extension Methods

There are a lot of cool features in the current C# version (and I’m sure that I will cover most of them in future postings), but one of the features I like most are Extension Methods.

If you’ve never heard about Extension Methods, let me cite the MSDN documentation on Extension Methods:

Extension methods enable you to “add” methods to existing types without creating a new derived type, recompiling, or otherwise modifying the original type.

Extension Methods are a very powerful feature when it comes to writing easy-to-understand code. So, over the course of the weeks and months I’ll post code fragments with (mostly) helpful Extension Methods, at least if they’re helpful for me. I will also upload the latest source code files to my blog.

Unless otherwise stated the code is provided as “Public Domain” which means that you can modify and use it in all your projects.

So, let’s get started with the first methods.

/// <summary>
/// Performs an action with each of the elements in this IEnumerable
/// </summary>
/// <param name="enumerable">this IEnumerable</param>
/// <param name="action">action to be performed on each element</param>
/// <returns>IEnumerable</returns>
public static IEnumerable<T> WithEach<T>(this IEnumerable<T> enumerable, Action<T> action) {
	if (action == null) {
		action = (obj) => {};
	}
	foreach (T oneObject in enumerable) {
		action(oneObject);
		yield return oneObject;
	}
}

/// <summary>
/// Concatinates all elements of this IEnumerable to a flat string, optionally quoting them
/// </summary>
/// <param name="enumerable">this IEnumerable</param>
/// <param name="glue">glue between the elements</param>
/// <param name="quoteStart">quote at start of each element</param>
/// <param name="quoteEnd">quote at end of each element</param>
/// <returns>flat string</returns>
public static string ToFlatString<T>(this IEnumerable<T> enumerable, string glue, string quoteStart, string quoteEnd) {
	if (glue == null) {
		glue = ",";
	}
	if (quoteStart == null) {
		quoteStart = "";
	}
	if (quoteEnd == null) {
		quoteEnd = "";
	}
	StringBuilder strBuilder = new StringBuilder();
	bool useGlue = false;
	foreach (T oneObject in enumerable) {
		if (useGlue == true) {
			strBuilder.Append(glue);
		} else {
			useGlue = true;
		}
		strBuilder.Append(quoteStart).Append(oneObject).Append(quoteEnd);
	}
	return strBuilder.ToString();
}

But wait, there’s more ;)

public static string ToFlatString<T>(this IEnumerable<T> enumerable, string glue)
public static string ToFlatString<T>(this IEnumerable<T> enumerable, string glue, Func<T, string> toStringFnc)

As don’t want this posting to be just code, I’ve only outlined the additional method signatures here, so feel free to download the complete file from http://blog.jcoder.me/files/csharp/IEnumerableExtensions.cs

If you have any questions or ideas for useful Extension Methods, please leave a comment below.

Netduino Traffic Light

Last week I got my GHI FEZ Internet of Things Kit, which includes – besides many accessory parts – a .NET-Microframework-powered Arduino-like board, the Netduino.

I started playing around with both the software and hardware, and the first thing that really worked was a very simple traffic light. It displays the light sequence red, red/yellow, green, yellow and back to red which is used in Germany. Although it is not that spectacular I’ve uploaded a short video showing the hardware setup and the light sequence.

This is the very simple code behind it:

using System;
using System.Threading;
using GHIElectronics.NETMF.FEZ;
using Microsoft.SPOT;
using Microsoft.SPOT.Hardware;

namespace NetduinoTrafficLights
{
    public class TrafficLightsDE
    {
        public static OutputPort Red = new OutputPort((Cpu.Pin)FEZ_Pin.Digital.Di1, false);
        public static OutputPort Yellow = new OutputPort((Cpu.Pin)FEZ_Pin.Digital.Di0, false);
        public static OutputPort Green = new OutputPort((Cpu.Pin)FEZ_Pin.Digital.Di3, false);

        public static void Main()
        {
            while (true)
            {
                Red.Write(true);
                Thread.Sleep(6000);

                Yellow.Write(true);
                Thread.Sleep(1000);

                Red.Write(false);
                Yellow.Write(false);
                Green.Write(true);
                Thread.Sleep(8000);

                Green.Write(false);
                Yellow.Write(true);
                Thread.Sleep(2000);

                Yellow.Write(false);
            }
        }

    }
}

Over the next weeks and month I will play around with more of the kit’s accessory parts and I’ll continue posting code (and maybe videos) about that. If you like (or don’t like) the video, feel free to leave a comment.